Digitization processes have become standard practice for large museums and cultural institutions. These processes can create a variety of products that can be shared with broader audiences and researchers. Museums can deliver things like high-quality photos, complex 3D scans of objects, immersive digital experiences, and endless applications for researchers. These projects are often incredibly expensive, require costly equipment and specialized knowledge, and take a tremendous amount of time to produce. With the barrier of entry so high, many smaller cultural institutions have no way of funding these projects, instead relying on unpredictable grant funding. Here I will be exploring potential low-cost alternatives to the traditional costly digitization project.
In the past, I have worked on a museum digitization project, working primarily with natural history collections. Our work was high-resolution static photography, with the objects inside of a lightbox. Working with that project inspired me to feel passionate about collections digitization, something that continues to fascinate me today. Our incredibly inexpensive setup was still only able to be realized because we were fortunate enough to have the project financed through a state grant. With the high barrier of entry to digitization projects of even a decent quality, I found myself constantly thinking of inexpensive ways to allow small museums to produce digital representations of their collection objects.
Recently lines of consumer technology like cellphones and tablets have come standard with LiDAR functions built into the camera sensors. This allows something like a cellphone to measure the distance from the camera to an object. This means that there are various applications that can use these LiDAR scans to create 3D renderings of complex objects. These scans are of course not as high quality as ones produced by dedicated LiDAR scanners, but the barrier for entry is far lower. The potential for museum employees to use inexpensive hardware (that some employees might already have) to produce even decent-quality 3D renderings can open many doors for smaller institutions. However, LiDAR is not the only avenue for producing renderings of objects.
The other type of digitization commonly seen in museums is 3D Photogrammetry. Photogrammetry is a process that uses multiple 2D photos of an object from numerous angles to stitch together a complex 3D model of the object in question. Photogrammetry is a more time-consuming process requiring post-processing and using often complicated and proprietary software. Other open-source alternatives are available but are typically built on Blender, a program frequently used for 3D modeling, which can have a steep learning curve. Photogrammetry setups typically require one or many DSLR cameras to capture many photos from different angles, and a rotating surface that allows an object being digitized to not require constant adjustment. The barriers to entry for this method are again primarily monetary. These scanning setups can be expensive to produce and time-consuming to produce scans with. The programs typically required to produce these models are also complicated and can require specialized knowledge. However, a potential solution again may reside in the consumer tech we all walk around with.
With recent technology allowing easier scans to be produced, and with cellphone cameras taking higher resolution photos than ever before, the opportunities for democratized 3D modeling are starting to be realized. In exploring the ways financially constrained museums can produce reasonable quality 3D scans I found numerous services and applications that offer cloud computing for 3D modeling using scans from cellphones and tablets. These applications require you to upload your photos or scans to their servers, where their automated processes will complete the modeling for the user and return a finalized 3D scan. These applications frequently offer a free limited license and an inexpensive unrestricted license. Of course, there is a catch, the question of ownership of the models produced is important for cultural institutions seeking to use these tools, and each application has different rules in their terms of service. The application I chose to use for this exploration, Polycam, grants the user ownership of the models produced but retains the rights to use said scans for a wide variety of applications on their end. (“Terms of Service.” poly.cam, May 1, 2023. https://poly.cam/terms_and_conditions.pdf#page7.)
Producing 3D scans has clearly become easier and cheaper than ever before. This means that previously cost-prohibitive scanning projects may be approachable for even financially constrained institutions. In terms of hardware, employees may already own a cellphone or tablet capable of performing LiDAR scans, and any relatively recent smartphone can take photos that will work for cloud-processed scans. These processes are intuitive and quick, meaning that there’s no need for specialized training or hiring staff with technical knowledge, this can be completed by almost any employee with a short training window.
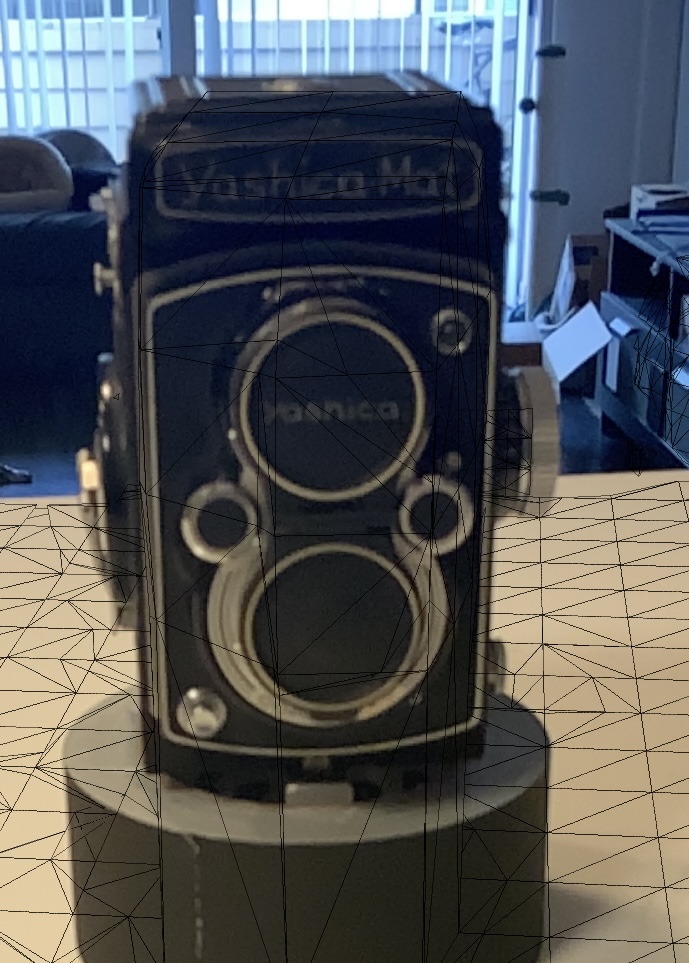
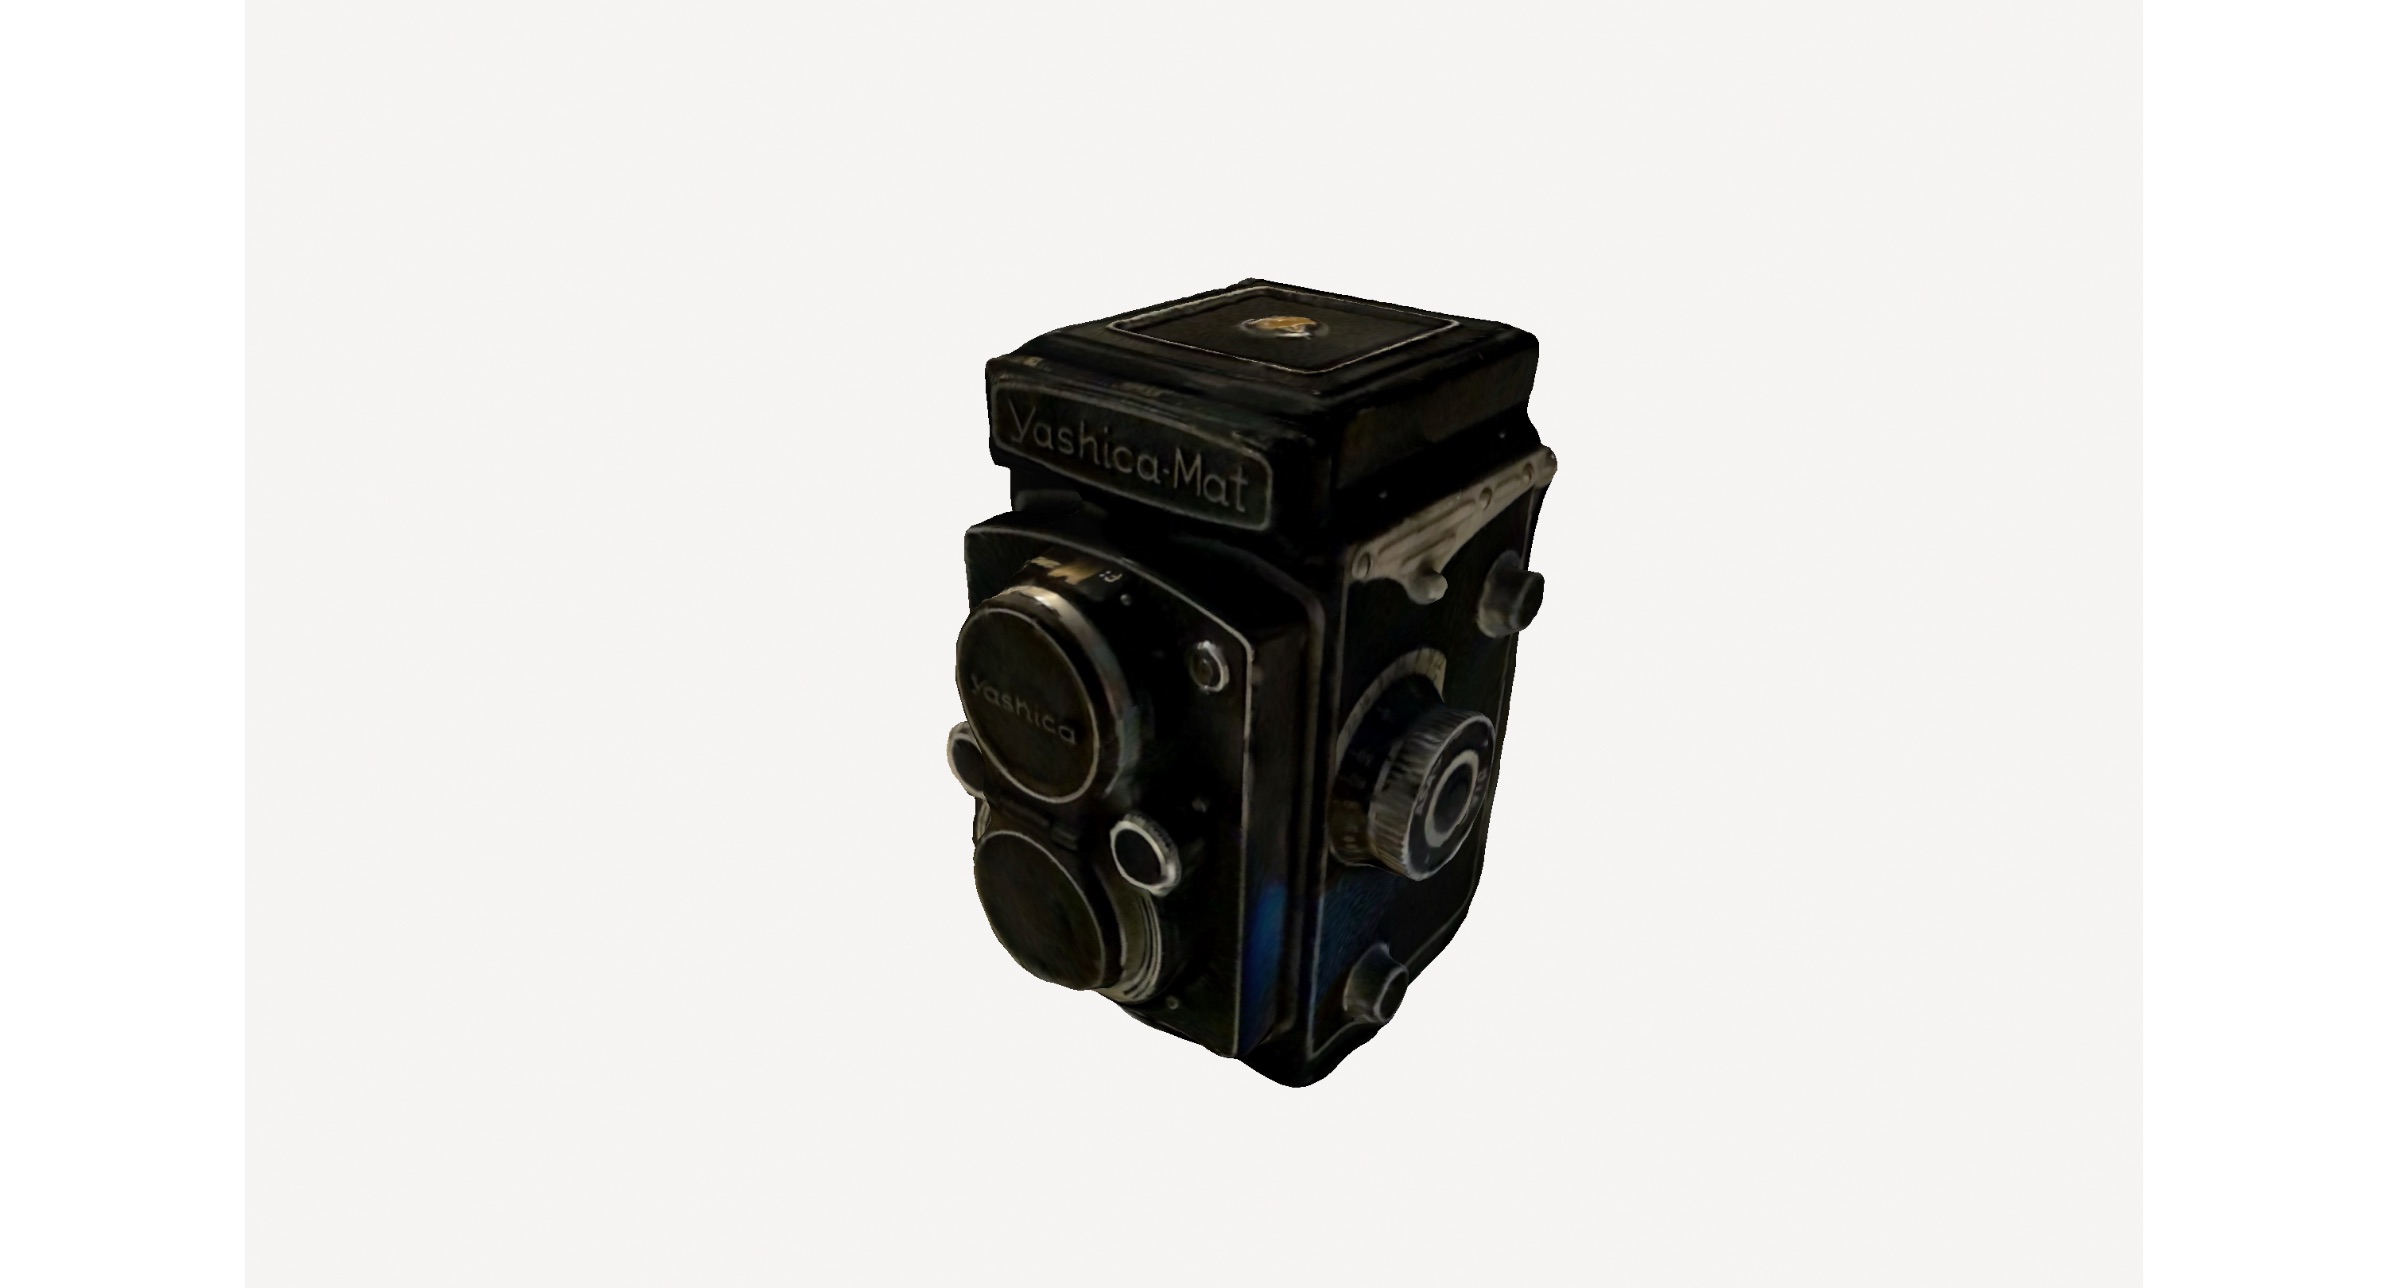
To illustrate the workflow, deliverables, and relative ease of these scanning processes I have created 3D models of an antique camera I had sitting on my desk. I chose this object because it is small and easy to handle, but is still complex with lots of room for detail. It will also serve to highlight the differences between LiDAR and photogrammetry-derived models. These scans were produced using Polycam, but the workflow is largely the same between any of the cloud processing scanning applications.
For producing the LiDAR-derived model, the camera was placed on a surface to elevate it from the countertop I was scanning it on. The app shows a wireframe projection when scanning in LiDAR capture mode, giving you an idea of what the scan will produce. This does not totally convey the final product, but it illustrates the concept of the scan itself. The application then requires you to physically move around the object. The camera measures the time it takes for light to reach the subject and then bounces back and uses this to estimate the distance of various points. The app then produces a raw LiDAR measurement of the object and the space around it. In the image, you will see several triangles floating in space in a circle. Each triangle represents an area in which a measurement was made. This is the final step that the user needs to complete before the data is sent to the application servers for processing. This raw LiDAR scan is uploaded and after a short wait (about 10 minutes in my experience) the finalized model is produced.
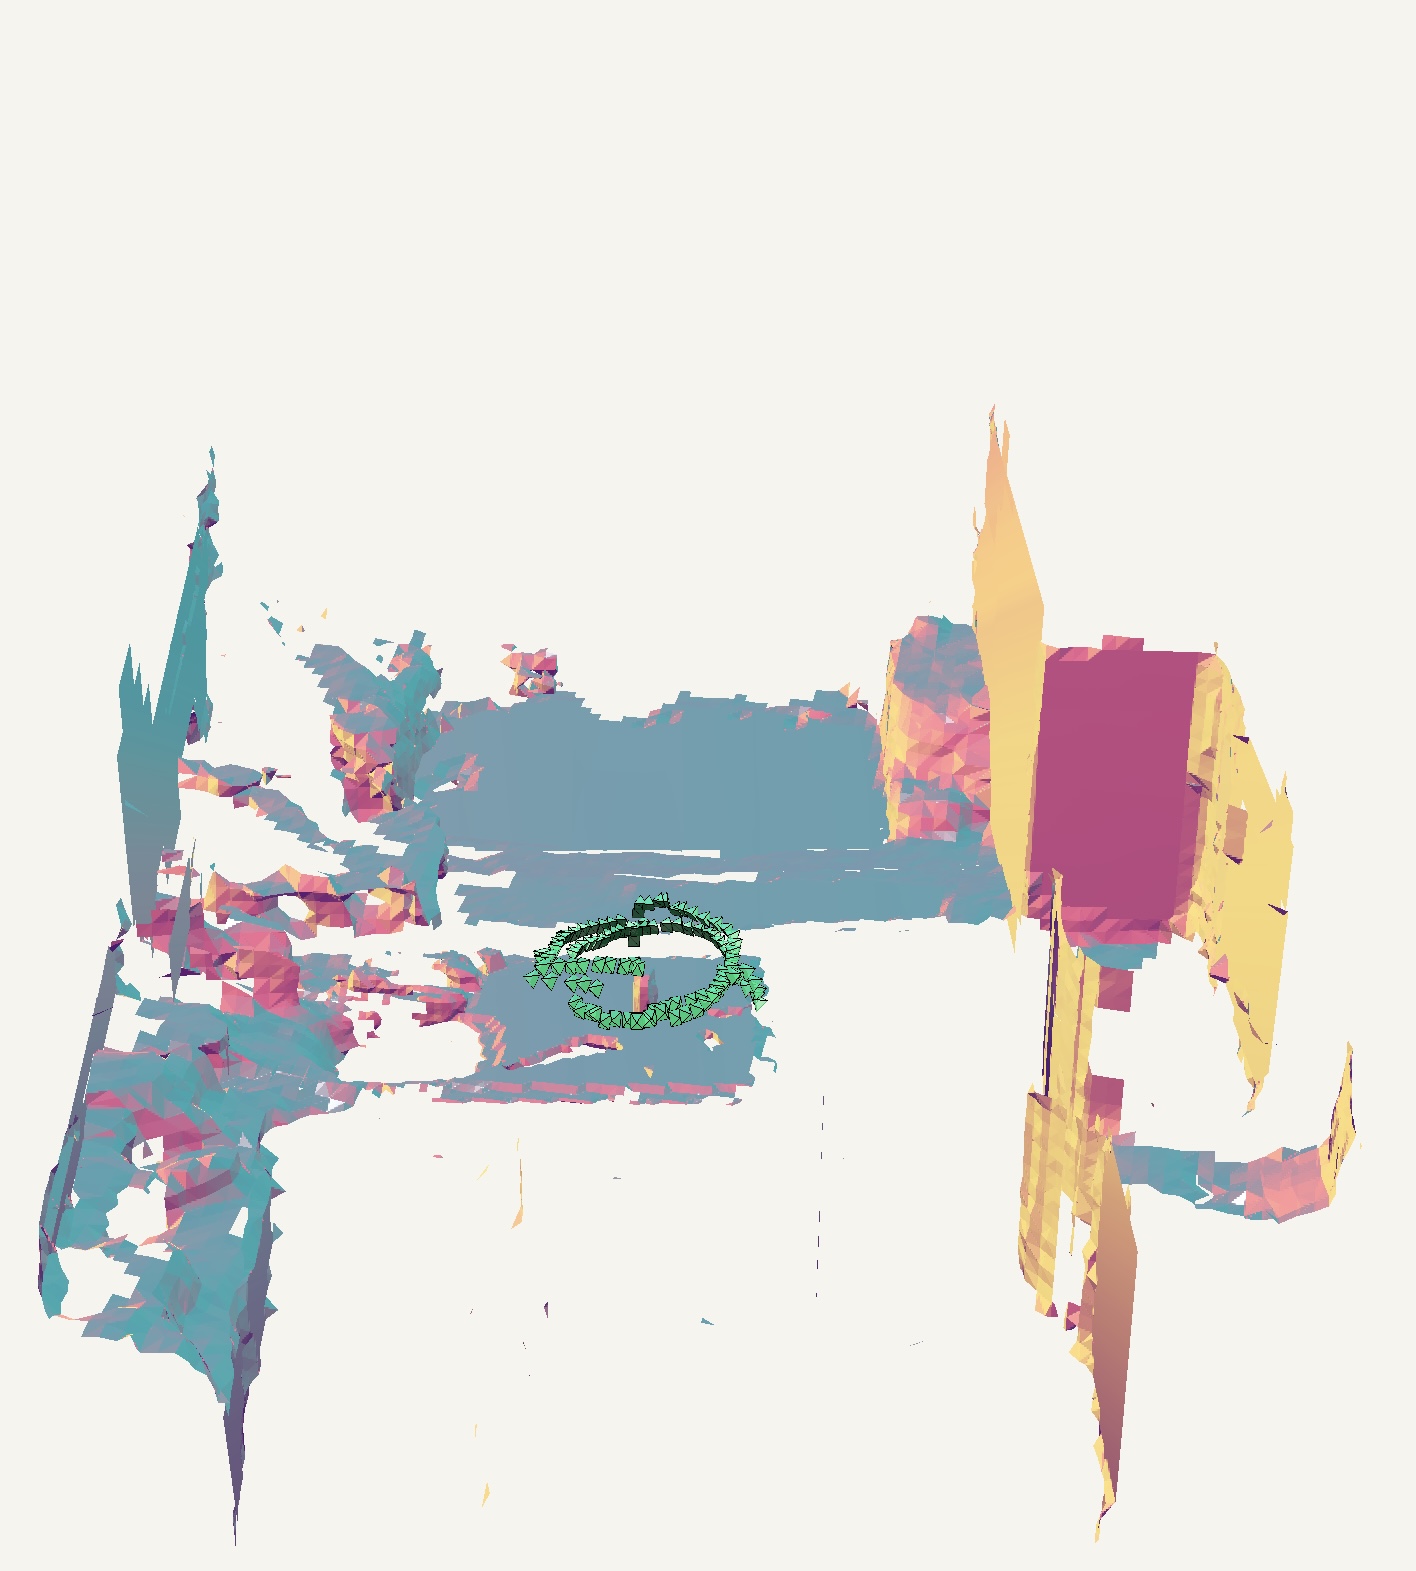
The scans produced using LiDAR are certainly quick to create and the easier of the two methods. The models produced are not necessarily of the best quality. The hard edges are rounded, there are inaccurate protrusions, and the texture looks like it was wrapped over the object mesh, creating a flatter image. There are upsides to this technique though. These models are naturally made to scale. There’s no need for post-processing to change the scale. This means that when using object viewing programs you can take measurements of the object good enough for reference in the case of object housing, display fabrication, or shipping container design. Producing these models could be useful for internal reference so objects do not require frequent handling. These scans may be more appropriate for larger and less complicated objects that would be difficult to capture with photogrammetry. Large archaeological objects, sculptures, furniture, and vehicles are just some examples of objects this scan may be more appropriate for.
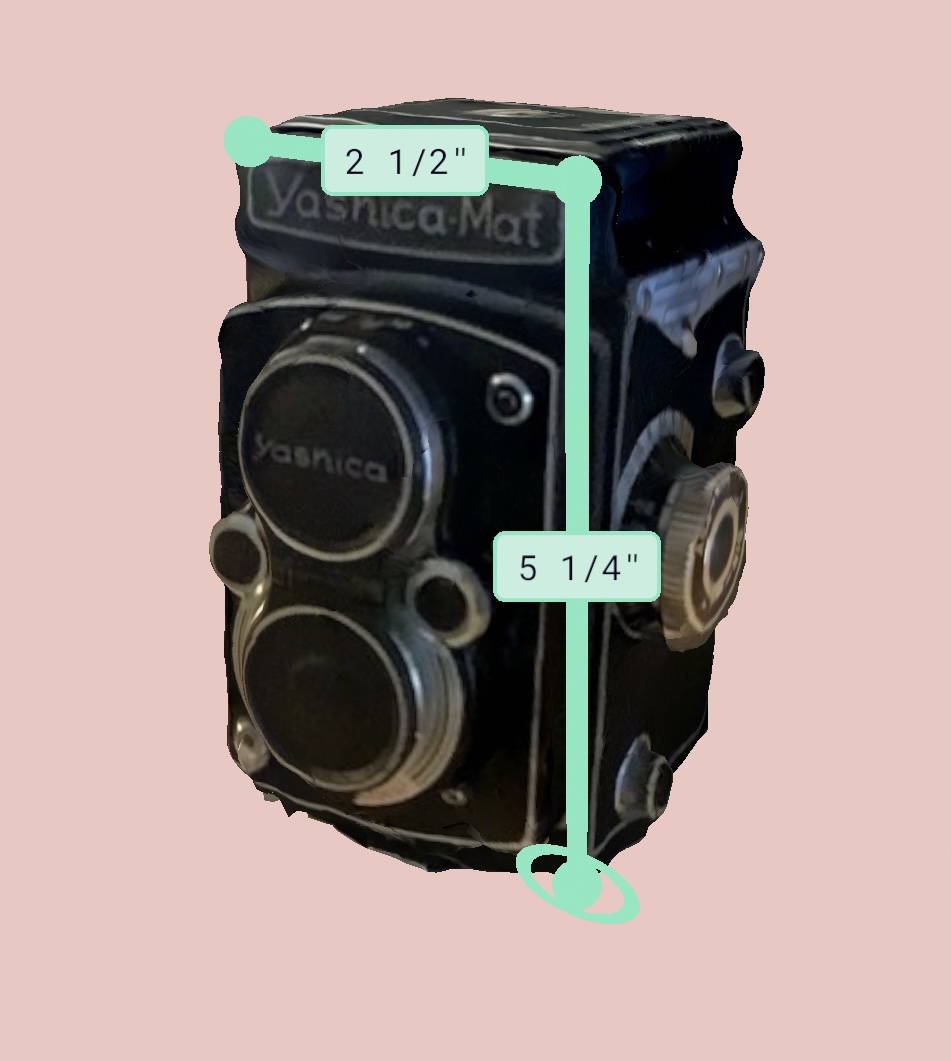
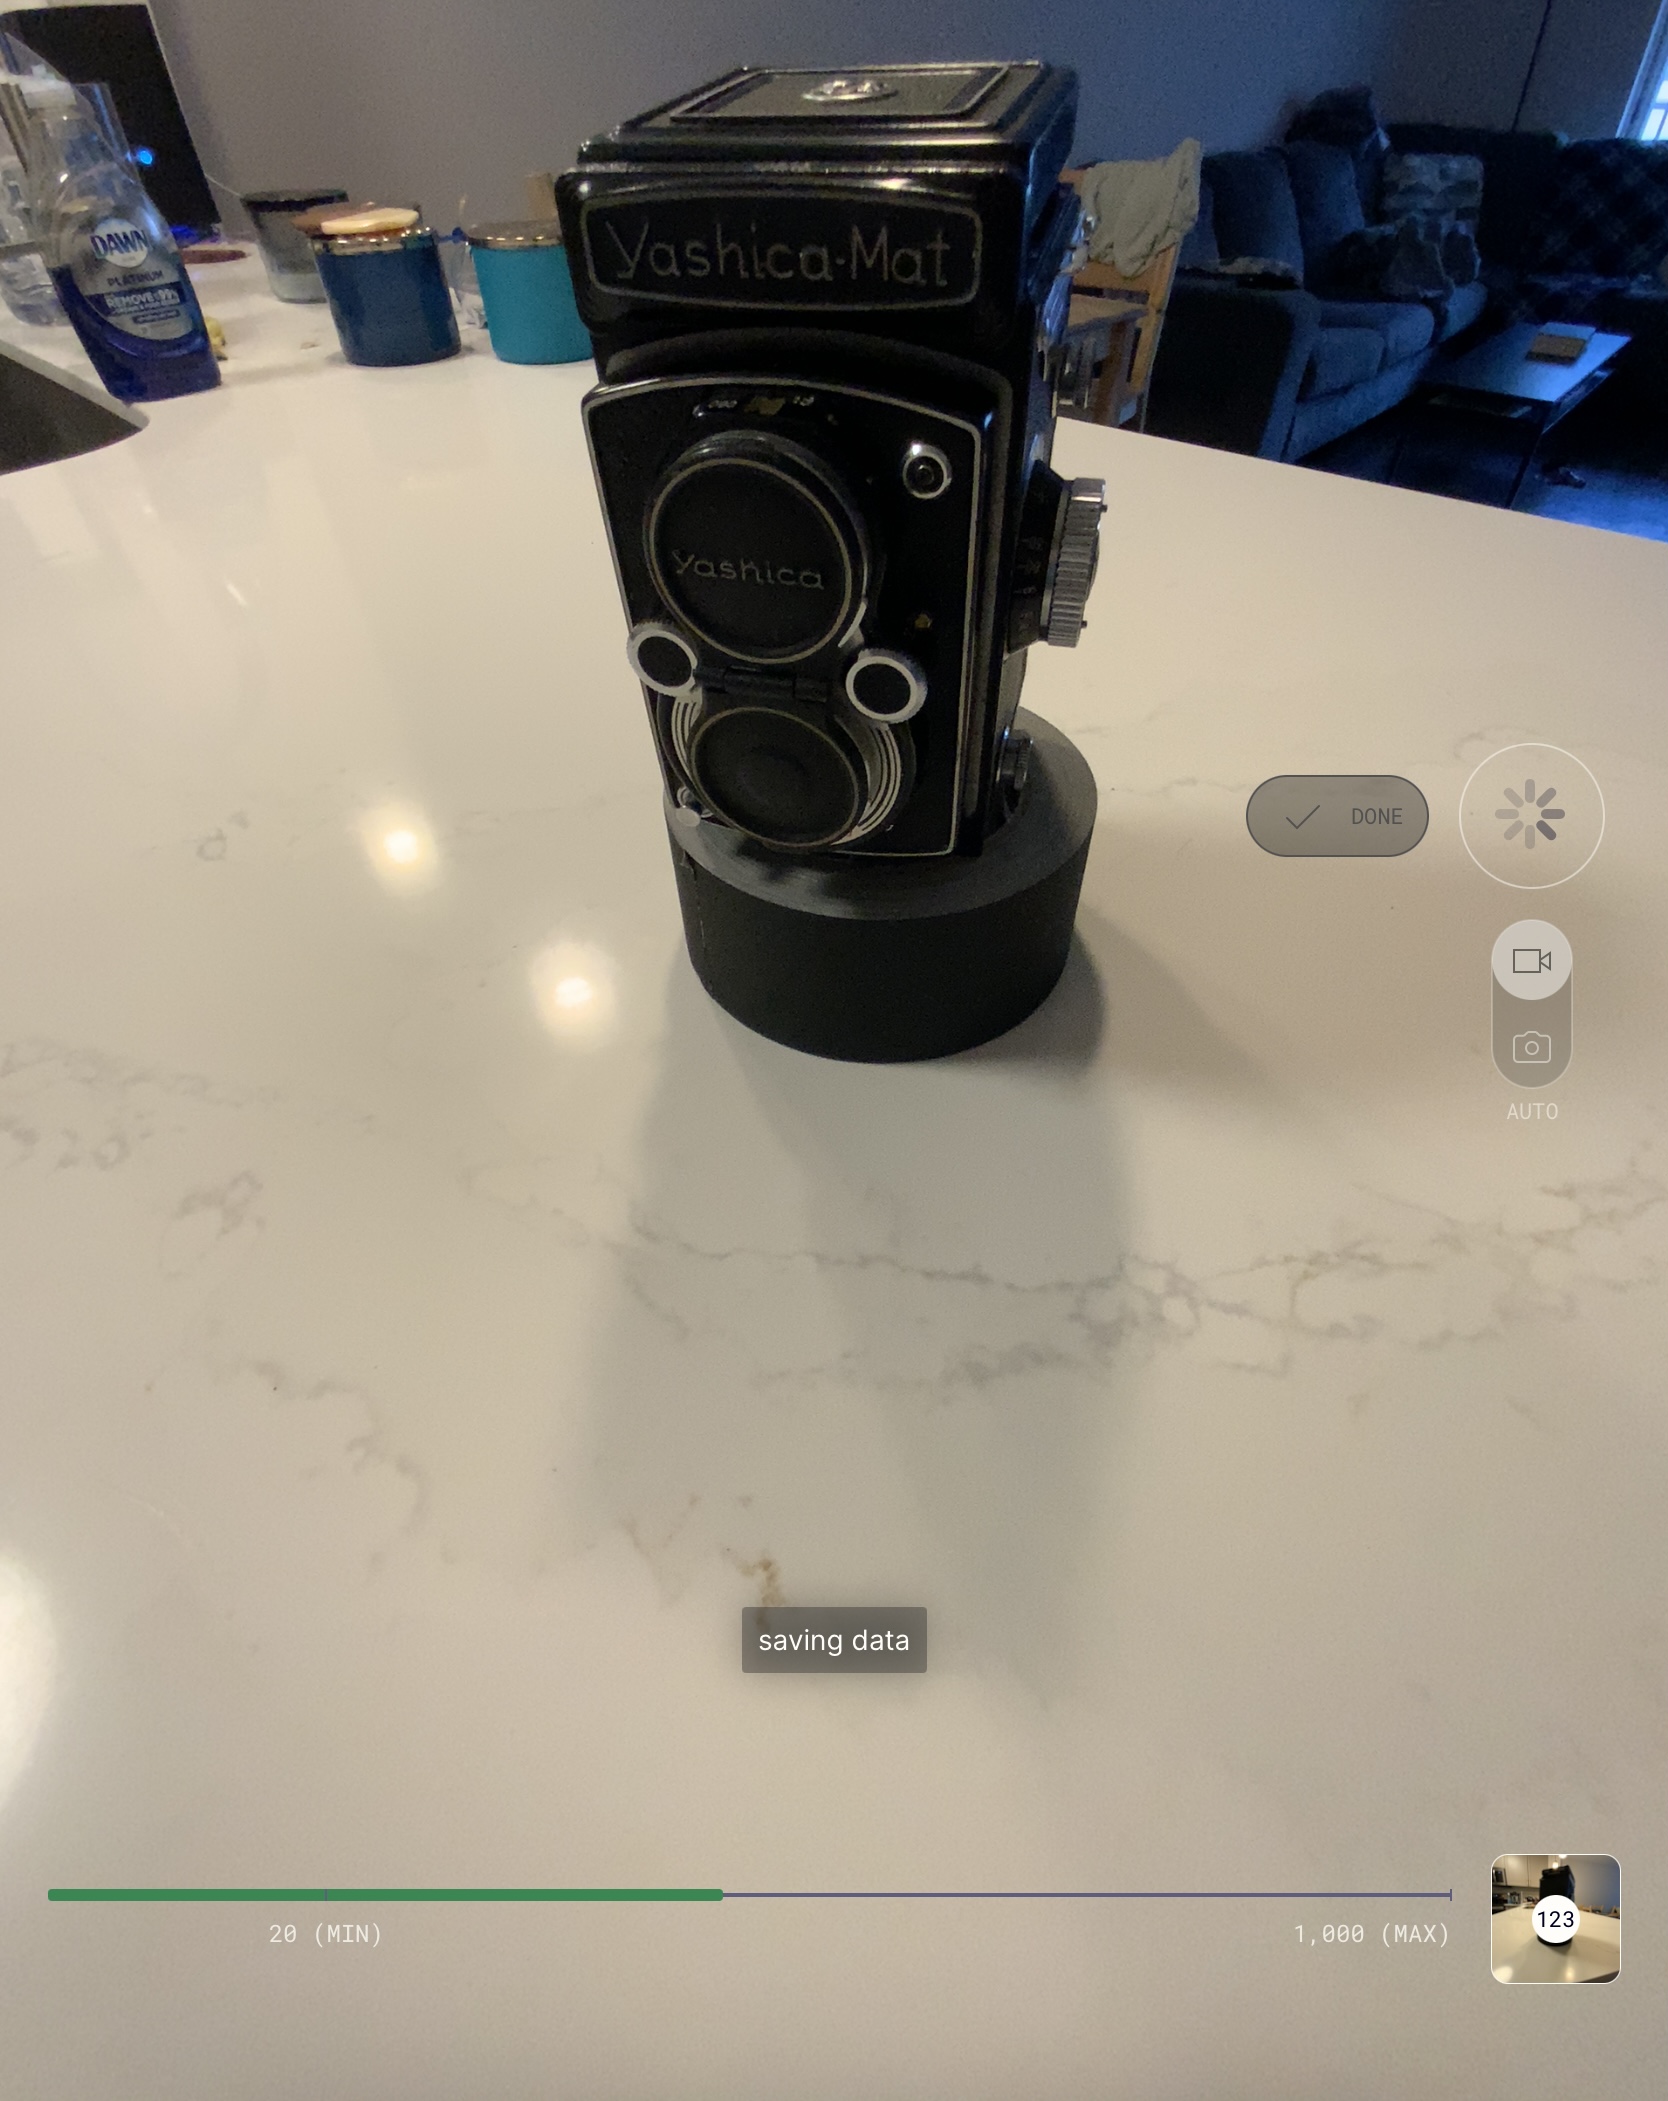
Creating models from a photogrammetry process was more time-consuming but ultimately produced a better result. The process started the same way as the LiDAR scan. The camera was placed on a surface to elevate it. Instead of walking around the camera and having my device automatically record the scans, I walked around the camera and manually took photos from the various angles in total I took 123 photos. These photos were taken from the lowest possible angle to get images underneath the overhangs. Many photos were also taken from a high angle to get several isometric perspectives of the entirety of the object. The photos were uploaded and began processing. For the photogrammetry process, the scans took longer to process, usually around 20-30 minutes. The final output was of a higher quality than the LiDAR scans. The surface texture was more accurately applied, edges and forms appear more accurate, and the areas of distress and damage on the object are more visible. This is a far more accurate process for a small and complex object like a camera.
Comparing these two processes illustrates a key discovery of this exploration. These processes are effective at accomplishing different objectives, and one is not inherently better than the other. LiDAR scans are quick but do not produce an incredible amount of detail on small complicated objects. Using these scans for large objects that would be difficult to produce with photogrammetry scanning can allow even the largest objects to be digitized. These scans can be used for smaller complex objects of course, but they may not be of a quality that the organization would want to release publicly. The fact that these models are produced already to scale means there’s potential for internal applications as well. Photogrammetry scanning is more time-consuming but ultimately does create much better scans. These scans may be more appropriate for public release.
The final important consideration for these processes is the ultimate quality of the scans themselves. Institutions exploring budget digitization objects should not expect scans that rival the detailed professional scans produced by large museums. The technology in our pockets cannot rival dedicated scanners and complex software that create these high-fidelity models. Organizations exploring these budget solutions should have discussions about the quality of scans they wish to achieve and what they would consider to be good enough quality for public release. Even if these processes are not employed by museums at this time, it is clearly worth following the innovations in this field. Five years ago, cloud computing photogrammetry scans derived from cellphone photos was something I would have never expected. As consumer technology continues to see innovation, we can expect to see further democratization of 3D scanning technology.
Bibliography
- “Terms of Service.” poly.cam, May 1, 2023. https://poly.cam/terms_and_conditions.pdf#page7.